Few kitchen tools boast the timeless appeal and versatility of a cast iron skillet. But when you add a perfectly fitted lid, you unlock a whole new dimension of culinary possibilities, transforming a simple pan into a powerhouse for braising, steaming, and slow cooking. This essential piece of cookware, your trusty Cast Iron Skillet With Lid, isn’t just a pot; it’s a legacy that can last for generations with proper care.
Cast iron cookware has a rich history, dating back centuries. Its origins can be traced to China, where iron casting for cooking vessels was practiced as early as the 6th century B.C. The technique eventually spread to Europe, becoming a staple in kitchens across the continent by the Middle Ages. The Dutch refined the sand-casting method, making mass production feasible, and by the 18th century, cast iron became synonymous with durable, reliable cookware in America, prized by pioneers and home cooks alike for its ability to withstand the rigors of open-fire cooking and produce consistently delicious results.
Why Every Kitchen Needs a Cast Iron Skillet with Lid
A cast iron skillet with lid isn’t just another pan in your cabinet; it’s a multifaceted workhorse that offers distinct advantages over other cookware.
- Exceptional Heat Retention: Cast iron heats slowly but retains heat incredibly well and evenly across its surface. This is crucial for searing meats to perfection, achieving a beautiful crust on bread, or maintaining a consistent simmer for stews.
- Unmatched Durability: Properly cared for, a cast iron skillet can last for decades, even centuries. It’s virtually indestructible, resisting warping at high temperatures and standing up to vigorous use.
- Natural Non-Stick Surface (When Seasoned): Over time and with consistent seasoning, your cast iron skillet develops a natural, chemical-free non-stick surface that improves with every use. This makes it ideal for eggs, pancakes, and delicate fish.
- Versatility from Stovetop to Oven: A cast iron skillet with lid can seamlessly transition from the stovetop to the oven, under the broiler, or even over an open campfire. This makes it perfect for dishes that require searing on the stove and then finishing in the oven, like frittatas, roasts, or skillet pizzas.
- The Power of the Lid: The lid transforms your skillet into a mini Dutch oven, trapping moisture and heat. This is invaluable for braising tough cuts of meat until they’re fall-off-the-bone tender, steaming vegetables, simmering sauces, or baking no-knead bread to achieve a perfectly crispy crust. It also helps prevent splattering, keeping your kitchen cleaner.
- Health Benefits: Cooking with cast iron can actually leach small amounts of dietary iron into your food, which can be a beneficial boost for some individuals.
The Art of Seasoning: Your Skillet’s First Defense and Ongoing Care
Seasoning is the cornerstone of cast iron care, creating that desirable non-stick surface and protecting your skillet from rust. Think of it as developing a protective, polymerized oil layer on the iron.
Initial Seasoning (for unseasoned or stripped skillets):
- Preheat Oven: Set your oven to 375-400°F (190-205°C).
- Clean Thoroughly: Wash the skillet with hot, soapy water and a stiff brush (this is one of the few times soap is acceptable for initial cleaning). Rinse thoroughly.
- Dry Completely: Dry the skillet immediately and completely using a towel. Then, place it on a burner over medium heat for 2-3 minutes to ensure all moisture evaporates.
- Apply Oil: Apply a very thin, even layer of high smoke point cooking oil (like flaxseed, grapeseed, vegetable, or canola oil) to the entire skillet – inside, outside, handle, and lid. “Thin” is key; too much oil will lead to a sticky, gummy finish. Use a paper towel to rub it in, then use a fresh paper towel to buff off any excess, making it look almost dry.
- Bake: Place the skillet upside down on the middle rack of your preheated oven. Place a sheet of aluminum foil on the rack below to catch any drips.
- Bake Time: Bake for one hour.
- Cool: Turn off the oven and let the skillet cool completely inside the oven. This helps the seasoning bond to the iron.
- Repeat (Optional but Recommended): For a superior initial seasoning, repeat steps 4-7 three to four more times. Each layer builds on the last, creating a stronger, more durable finish.
Regular Maintenance Seasoning:
Every time you cook with oil and heat in your skillet, you are effectively adding to its seasoning. However, occasional dedicated re-seasoning can help maintain and improve its surface.
- After cleaning and drying, apply a very thin layer of oil to the cooking surface and heat it over medium heat on the stovetop until it just starts to smoke.
- Let it cool, then wipe off any excess oil. This quick stovetop seasoning helps to maintain the non-stick quality and prevent rust.
How to Clean and Properly Store Your Cast Iron Skillet with Lid
Caring for your cast iron skillet with lid isn’t complicated, but it does require a specific approach to maintain its seasoned surface.
Cleaning After Use:
- Cool Slightly: Let the skillet cool down a bit after cooking, but don’t let it get completely cold. Cleaning while it’s still warm is easier.
- Scrape Off Food: Use a metal spatula or a plastic pan scraper to remove any stuck-on food bits.
- Hot Water & Stiff Brush: Rinse the skillet under hot running water. Use a stiff nylon brush, a chain mail scrubber, or even a coarse salt scrub to gently scrub away any remaining food residue. Avoid harsh soaps, as they can strip the seasoning.
- Avoid Metal Scouring Pads: Steel wool or abrasive metal pads can strip away seasoning.
- Dry Immediately and Thoroughly: This is critical! Water is cast iron’s enemy. Immediately dry your skillet with a towel. For extra measure, place it on a stovetop burner over low heat for a few minutes until all moisture has evaporated.
- Light Oil Rub: While the skillet is still warm, apply a very thin layer of cooking oil to the entire surface (inside and out) with a paper towel. Buff it until it looks dry, just leaving a microscopic film. This protects it from rust and maintains the seasoning.
Proper Storage:
- Dry Environment: Store your clean, dry, and lightly oiled cast iron skillet in a dry place.
- Airflow: If stacking multiple cast iron pieces, place a paper towel or cloth between them to allow for airflow and absorb any residual moisture, preventing scratches and rust.
- Avoid Humid Areas: Do not store cast iron in damp or humid areas, as this can lead to rust.
Delicious Dishes Perfect for Your Cast Iron Skillet with Lid
The cast iron skillet with lid is a versatile tool for countless recipes. Here are just a few ideas:
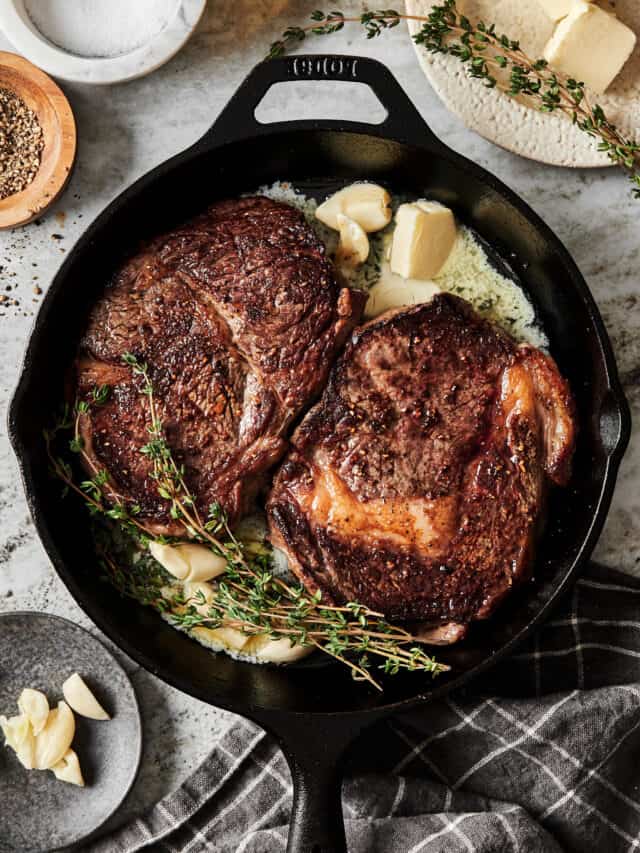
- Seared Steaks and Pan Sauces: Achieve a perfect crust on your steak, then use the fond (browned bits) in the pan to build a rich pan sauce with the lid on to simmer.
- One-Pan Roasts: Sear chicken or pork on the stovetop, then add vegetables, broth, and the lid, and transfer to the oven for a tender, flavorful meal.
- No-Knead Bread: The even heat and trapped steam from the lid create a bakery-quality crust and a soft, airy interior.
- Braised Short Ribs: Slowly braise tough cuts of meat until they are incredibly tender and succulent, thanks to the lid keeping moisture locked in.
- Skillet Pizza: Get a wonderfully crispy crust on your homemade pizza by cooking it directly in a seasoned cast iron skillet.
- Deep Dish Quiche or Frittata: Start on the stovetop to set the base, then finish baking in the oven with or without the lid.
- Fried Chicken: The heavy bottom and even heat retention of cast iron are perfect for achieving perfectly crispy, golden-brown fried chicken.
Tips and Tricks When Cooking with Your Cast Iron Skillet with Lid
Mastering your cast iron skillet with lid involves a few simple tricks that enhance your cooking experience:
- Preheat Slowly and Thoroughly: Cast iron needs time to heat up evenly. Don’t rush it. Place it over medium heat for 5-10 minutes before adding food.
- Use Enough Oil (but not too much): A thin layer of cooking oil or fat (butter, bacon grease, ghee) is essential to prevent sticking and to build up seasoning.
- Avoid Extremely Acidic Foods for Long Periods: While occasional use is fine, cooking highly acidic foods like tomato sauce or lemon juice for extended periods can strip the seasoning and impart a metallic taste to your food.
- Handle Hot! Always remember your cast iron handle will get extremely hot, especially when transferring from stovetop to oven. Use a potholder or a silicone handle cover.
- Don’t Fear High Heat (But Control It): Cast iron can handle high temperatures, which is great for searing. However, once hot, it stays hot. Adjust heat accordingly.
“A well-loved cast iron skillet is more than just a pan; it’s a testament to good cooking and shared meals,” says Chef Alistair Finch, a renowned culinary historian specializing in traditional cookware. “The lid simply elevates its capabilities, making it indispensable for everything from a rustic braise to a perfectly baked loaf of bread. It connects us to centuries of culinary tradition.”
Frequently Asked Questions About Your Cast Iron Skillet with Lid
Q1: Can I really use soap on my cast iron skillet?
A1: Yes, modern mild dish soap is generally fine for a well-seasoned cast iron skillet. The old advice against soap dates back to when lye-based soaps were common and would strip seasoning. Just avoid harsh scrubbing pads.
Q2: My cast iron skillet is sticky after seasoning. What went wrong?
A2: A sticky skillet usually means too much oil was applied during the seasoning process, or it wasn’t heated long enough at a high enough temperature. Wipe off the excess oil and re-bake it for another hour.
Q3: How do I remove rust from my cast iron skillet?
A3: For light rust, scrub with a steel wool pad, a stiff brush, or a chain mail scrubber until the rust is gone. Wash, dry thoroughly, and then re-season the skillet immediately. For heavier rust, you might need to use a vinegar soak before scrubbing.
Q4: Is a cast iron skillet with lid good for deep frying?
A4: Absolutely! The heavy mass of cast iron maintains a stable oil temperature, which is crucial for crispy, evenly cooked deep-fried foods. The lid can also help contain splatters while the oil is heating.
Q5: Can I put my cast iron skillet in the dishwasher?
A5: No, never put your cast iron skillet in the dishwasher. The harsh detergents and prolonged exposure to water will strip the seasoning and cause immediate rusting. Always hand wash and dry.
Q6: What’s the best oil for seasoning cast iron?
A6: High smoke point oils like grapeseed, flaxseed, vegetable, or canola oil are excellent choices for seasoning. Flaxseed oil is often touted for creating a very hard, durable seasoning layer, though it can be more prone to flaking if not applied incredibly thin.
Q7: My food sticks even though my skillet is seasoned. What can I do?
A7: Ensure you are preheating your skillet properly and using enough cooking fat. Also, make sure your food isn’t too cold when it hits the pan; room temperature ingredients often stick less. If sticking persists, your seasoning might need to be reinforced with a few more seasoning cycles.
Conclusion
Embracing a cast iron skillet with lid is an investment in your culinary future. It’s more than just a piece of cookware; it’s a tool that connects you to generations of cooks and allows you to create incredible, flavorful meals that simply aren’t possible with other pans. From perfect searing to tender braises, from hearty breakfast dishes to artisan breads, the versatility and durability of cast iron make it an invaluable asset in any kitchen. With a little care and consistent use, your cast iron skillet with lid will not only elevate your cooking but become a cherished heirloom, building character and flavor with every delicious dish. So, go ahead, unlock its full potential and enjoy the rich rewards of cooking with this enduring kitchen classic.